

Cryptoway API Documentation
Введение
API интеграции
Endpoint: https://api.cryptoway.com
Cryptoway API подписывается по схеме HMAC-SHA256. Документация состоит из четырёх разделов:
Подпись
Подпись
Ключи
| Ключ | Где взять | Для чего |
|---|---|---|
| Project ID + secret | Личный кабинет, раздел API keys | Подпись запросов к API |
| callback_key | Личный кабинет, профиль | Проверка webhook |
Для webhook используйте callback_key, не secret API key.
Получение ключей API
Один API key можно использовать для всех методов API, если при создании включены нужные разрешения.
Параметры при создании ключа
| Параметр | Описание |
|---|---|
| description | Название ключа |
| allowed_ips | Список разрешённых IP. Можно оставить пустым |
| is_deposit_allowed | Разрешить операции с депозитами |
| is_withdrawal_allowed | Разрешить выводы |
Если allowed_ips пуст, первый успешный запрос с API автоматически добавит текущий IP в список.
Инструкция
- Зарегистрируйтесь в сервисе.
- Перейдите во вкладку «API ключи».
- Нажмите «Создать API ключ».
- Укажите название, разрешения и IP в форме создания.
- После сохранения сразу запишите ключи из модального окна. Secret показывается один раз.
- Готово.
В запросах используйте Project ID как X-API-Key-ID, а secret — для подписи. Имя заголовка не менялось: значение из кабинета называется Project ID, а передаётся в X-API-Key-ID.
callback_key
Ключ для проверки webhook находится в профиле личного кабинета. Он не совпадает с secret API key.
Заголовки запроса к API
| Заголовок | Описание |
|---|---|
X-API-Key-ID | Project ID (UUID) |
X-Timestamp | Unix timestamp, секунды |
X-Signature | HMAC-SHA256 hex |
Подпись обязательна для всех публичных эндпоинтов (метод GET, POST и др.).
Алгоритм подписи API
- Соберите объект:
{
  "params": "url_encoded_query_string",
  "body": {},
  "path": "/user/balance/"
}params— query string как в URL (search_query=foo, без?)body— JSON тела запроса;{}если тела нетpath— путь запроса, например/user/balance/
- Сериализуйте объект:
json.dumps(data, separators=(",", ":"), sort_keys=True) - Подпись:
signature = HMAC-SHA256(key=API_KEY_SECRET, message=timestamp + json_string)- Timestamp должен быть в пределах ±15 секунд от серверного времени.
Если allowlist ключа пуст, при первом успешном запросе текущий IP записывается в allowlist. Дальнейшие запросы принимаются только с IP из списка.
Пример: GET баланс
# params пустые, body {}
# path = /user/balance/
# data = {"body":{},"params":"","path":"/user/balance/"}

curl "https://api.cryptoway.com/user/balance/" \
  -H "X-API-Key-ID: <PROJECT_ID>" \
  -H "X-Timestamp: 1718659200" \
  -H "X-Signature: <hex>"
Пример: POST адрес
curl "https://api.cryptoway.com/user/address/" \
  -X POST \
  -H "Content-Type: application/json" \
  -H "X-API-Key-ID: <PROJECT_ID>" \
  -H "X-Timestamp: 1718659200" \
  -H "X-Signature: <hex>" \
  -d '{"symbol_id":"USDTBEP20","callback_url":"https://example.com/cb","description":"shop"}'
Генерация подписи
:::tabs
import hashlib, hmac, json, time

def sign(key: str, timestamp: int, data: dict) -> str:
    s = json.dumps(data, separators=(",", ":"), sort_keys=True)
    return hmac.new(key.encode(), f"{timestamp}{s}".encode(), hashlib.sha256).hexdigest()

data = {"params": "", "body": {"symbol_id": "USDTBEP20"}, "path": "/user/address/"}
ts = int(time.time())
signature = sign(API_KEY_SECRET, ts, data)
$data = ["params" => "", "body" => ["symbol_id" => "USDTBEP20"], "path" => "/user/address/"];
ksort($data);
$json = json_encode($data, JSON_UNESCAPED_SLASHES);
$signature = hash_hmac("sha256", time() . $json, $API_KEY_SECRET);:::
Webhook: проверка подписи
На ваш callback_url приходит POST.
Заголовки:
| Заголовок | Описание |
|---|---|
X-Signature | HMAC-SHA256 hex |
X-Timestamp | Unix timestamp |
Данные для подписи:
{
  "params": "",
  "body": { }
}params— query string вашего endpointbody— распарсенное JSON тело POST- поле
pathне используется - для подписи используется
callback_key
Допустимое отклонение timestamp: ±15 секунд.
Webhook депозита / вывода
В теле POST передаётся JSON-объект транзакции (поля описаны ниже). Для проверки подписи этот объект помещается в поле body, поле params оставляют пустым.
Webhook счёта (invoice)
{
  "params": "",
  "body": {
    "type": "invoice",
    "id": "5ca38db1-00c5-4aba-91e5-6a57bed60aee",
    "status": "executed"
  }
}
Тело POST совпадает с объектом подписи: на верхнем уровне поля params и body. Для проверки подписи используйте распарсенное тело запроса целиком, без дополнительной обёртки.
Python: проверка webhook
Webhook депозита и вывода:
body = await request.json()
data = {"params": request.url.query, "body": body}
verify(request.headers["X-Signature"], CALLBACK_KEY, int(request.headers["X-Timestamp"]), data)
Webhook счёта:
data = await request.json()
verify(request.headers["X-Signature"], CALLBACK_KEY, int(request.headers["X-Timestamp"]), data)
Общая функция verify:
def verify(signature: str, key: str, timestamp: int, data: dict) -> bool:
    if abs(int(time.time()) - timestamp) > 15:
        return False
    expected = sign(key, timestamp, data)
    return hmac.compare_digest(expected, signature)
Депозиты
Депозиты
Депозит регистрируется после on-chain перевода на адрес, полученный через API. Сканер блокчейна создаёт транзакцию с типом deposit.
Начало работы
Перед интеграцией создайте API key (раздел «Подпись»). Без ключа запросы к API не проходят.
Выбор типа интеграции
Доступны два способа приёма депозитов.
Счёт на оплату (Invoice)
Подходит для оплаты товара или услуги на фиксированную сумму.
Создание: POST /invoice/. Укажите сумму в фиате (target_value_fiat) или в крипте (target_value_symbol).
Символ и адрес
- Если при создании указан
symbol_id, сразу генерируется адрес и ссылкаpay_url. - Если
symbol_idне указан, плательщик выбирает символ и сеть на странице оплаты. Адрес появится после выбора.
Уведомления
| Событие | Webhook |
|---|---|
| Поступил on-chain перевод | Webhook депозита: сумма, hash, статус транзакции |
| Сумма по счёту набрана | Webhook счёта: status: executed |
| Истёк срок счёта без полной оплаты | Webhook счёта: status: expired |
Статусы счёта: active, executed, expired, cancelled. Промежуточных статусов частичной оплаты (paid_over, wrong_amount и т.п.) нет. Частичные переводы приходят как отдельные webhook депозита; счёт переходит в executed, когда сумма депозитов достигает цели, или в expired по deadline_at.
Постоянный адрес
Подходит для пополнения баланса без фиксированной суммы.
Создание: POST /user/address/. Укажите symbol_id и при необходимости external_id (ваш идентификатор адреса).
На адрес можно отправлять переводы любой суммы выше min_deposit_amount. Каждый перевод создаёт депозит и отдельный webhook.
Общий порядок
- Создайте счёт или постоянный адрес.
- Плательщик отправляет перевод on-chain.
- Сканер фиксирует депозит. Если указан
callback_url, отправляется webhook.
Эндпоинты
| Метод | Путь | Описание |
|---|---|---|
| POST | /user/address/ | Постоянный адрес |
| GET | /user/address/ | Список адресов |
| GET | /user/address/balance/{symbol_id}/ | Последний адрес пополнения баланса по символу |
| POST | /invoice/ | Счёт с адресом |
| GET | /invoice/ | Список счетов |
| GET | /invoice/my/{invoice_id}/ | Один счёт |
| GET | /invoice/{invoice_id}/transactions/ | Депозиты по счёту |
| GET | /user/transaction/ | История (type=deposit) |
| GET | /user/transaction/{encoded_id}/ | Одна транзакция |
POST /user/address/
Запрос
| Поле | Тип | Описание |
|---|---|---|
| symbol_id* | string | Идентификатор символа: валюта в конкретной сети, например USDTBEP20, BNBBEP20. Список значений: GET /symbol/ (раздел 4) |
| callback_url | string | URL для webhook депозита |
| description | string | Метка адреса |
| external_id | string | Ваш ID |
Виртуальные символы (USDT) не принимаются. Указывайте символ с привязкой к сети.
Ответ
| Поле | Описание |
|---|---|
| id | ID адреса |
| value | Адрес кошелька |
| symbol_id | Идентификатор символа |
| callback_url | URL webhook |
| external_id | Ваш ID |
| created_at | Дата создания |
POST /invoice/
Запрос
| Поле | Тип | Описание |
|---|---|---|
| name* | string | Название |
| symbol_id | string | Идентификатор символа для оплаты |
| target_value_fiat | decimal | Сумма в фиате |
| target_currency_fiat | string | Фиат, по умолчанию USD |
| target_value_symbol | decimal | Сумма в крипте |
| deadline_at | datetime | Срок счёта |
| callback_url | string | URL webhook статуса счёта |
| external_id | string | Ваш ID |
| is_payer_fee | bool | Комиссию платит плательщик |
| description | string | Описание |
Нужно указать target_value_fiat или target_value_symbol.
Ответ
Адрес оплаты в target_wallet.value, текущий status, ссылка на оплату в pay_url.
GET /user/transaction/
Фильтры для депозитов:
| Параметр | Описание |
|---|---|
| type | deposit |
| symbol_id | Идентификатор символа |
| external_id | Ваш ID |
| status | pending, executed, dirty_lock, cancelled |
| in_processing | true — только транзакции в обработке; false — завершённые |
| begin_at, end_at | Период |
Webhook депозита
POST на callback_url, указанный при создании адреса. Для депозита по счёту используется callback_url счёта.
Тело (основные поля):
| Поле | Описание |
|---|---|
| type | deposit |
| status | Статус транзакции |
| symbol_id | Идентификатор символа |
| amount | Сумма зачисления на баланс |
| service_fee | Комиссия сервиса |
| net_amount | Сумма on-chain перевода (amount + service_fee) |
| blockchain_data.hash | Tx hash |
| blockchain_data.from_address | Отправитель |
| blockchain_data.to_address | Получатель (ваш адрес) |
| external_id | Ваш ID из адреса |
| invoice | Данные счёта, если депозит по invoice |
| aml_order | Статус AML, если проверка включена |
| callback_order | Статус последней доставки webhook (last_status_code, last_response_data) |
Пример
{
  "user_id": 1,
  "type": "deposit",
  "created_at": "2025-11-20T16:08:10.180830+00:00",
  "symbol_id": "USDTBEP20",
  "status": "executed",
  "amount": "4.696700000000000000",
  "service_fee": "0.803300000000000000",
  "net_amount": "5.500000000000000000",
  "blockchain_data": {
    "hash": "0xabc...",
    "from_address": "0x123",
    "to_address": "0x456"
  },
  "external_id": null,
  "callback_url": "https://example.com/cb"
}
Webhook счёта
Отдельный callback при смене статуса счёта (executed, expired). Формат тела и проверка подписи описаны в разделе «Webhook счёта (invoice)».
Статусы депозита
| status | Описание |
|---|---|
| pending | Ожидание AML или подтверждений сети |
| executed | Зачислено на баланс |
| dirty_lock | Адрес помечен dirty, депозит заблокирован |
| cancelled | Отменён |
Статусы счёта
| status | Описание |
|---|---|
| active | Ожидает оплаты |
| executed | Оплачен |
| expired | Истёк срок |
| cancelled | Отменён |
Доставка webhook
При неуспешном ответе вашего сервера webhook повторяется автоматически.
Если сервер уже ответил 2xx на первый webhook, повтор при смене статуса на executed не отправляется. При AML или ожидании подтверждений первый webhook может прийти со статусом pending.
Актуальный статус транзакции запрашивайте через GET /user/transaction/ или GET /user/transaction/{encoded_id}/.
Минимальная сумма
Депозиты ниже min_deposit_amount игнорируются. Актуальное значение: GET /setting/fees/ (раздел 4).
Выводы
Выводы
Эндпоинты
| Метод | Путь | Описание |
|---|---|---|
| POST | /user/balance/withdrawal/ | Создать вывод |
| GET | /user/transaction/?type=withdrawal | История и статус |
| GET | /user/transaction/{encoded_id}/ | Одна транзакция |
Отдельного GET /withdrawal/{id} нет. Используйте transaction API.
POST /user/balance/withdrawal/
Query
| Параметр | Описание |
|---|---|
| totp_code | OTP из email. Не нужен при авторизации API key |
Запрос
| Поле | Тип | Описание |
|---|---|---|
| symbol_id* | string | Идентификатор символа, например USDTTRC20. Список значений: GET /symbol/ (раздел 4) |
| to_address* | string | Адрес получателя |
| amount* | decimal | Сумма получателю (net) |
| external_id | string | Ваш ID |
| callback_url | string | URL webhook |
| extra.memo | string | Memo/tag (если сеть поддерживает) |
Виртуальные символы не принимаются.
Комиссия списывается сверх amount. С баланса уходит amount + service_fee.
Ответ
JSON-объект транзакции: "type": "withdrawal", текущий статус вывода в status, идентификатор в encoded_id.
Ошибки
| detail | Причина |
|---|---|
| Insufficient balance | Недостаточно средств |
| Invalid address | Неверный адрес |
| Minimum withdrawal amount is ... | Ниже минимума |
| TOTP code is required | Нужен totp_code без API key |
| MEMO doesn't supported on this chain! | Memo не поддерживается |
Rate limit: 15 запросов за 15 секунд.
GET /user/transaction/
| Параметр | Описание |
|---|---|
| type | withdrawal |
| status | Статус вывода |
| in_processing | true — только выводы в обработке |
| external_id | Ваш ID |
Webhook вывода
Отправляется один раз при переходе вывода в статус executed.
Тело
JSON-объект транзакции с "type": "withdrawal". Поля совпадают с объектом в webhook депозита.
| Поле | Описание |
|---|---|
| amount | Сумма транзакции (получатель + комиссия) |
| service_fee | Комиссия |
| net_amount | Сумма получателю (amount - service_fee) |
| status | executed |
| blockchain_data.hash | Tx hash |
| to_address | Адрес получателя |
| memo | Memo, если был |
| external_id | Ваш ID |
Подпись проверяется ключом callback_key по заголовкам X-Signature, X-Timestamp и структуре данных с полями params и body.
Статусы вывода
| status | Описание |
|---|---|
| compliance_approve_required | Ожидает ручного одобрения |
| created | В очереди |
| aml_order_pending | AML проверка |
| prepare_pending | Подготовка транзакции |
| ready_to_transfer | Готов к отправке |
| transfer_lock | Отправка в сеть |
| pending | Ожидание подтверждений |
| swap_lock | Ожидание autoswap |
| executed | Выполнен |
| cancelled | Отменён админом |
| cancelled_by_risk | Отменён по AML |
| failed | Ошибка |
Фильтр in_processing=true возвращает все статусы, кроме executed, cancelled, cancelled_by_risk, failed.
Ограничения
| Параметр | Описание |
|---|---|
| min_withdrawal_amount | Минимум по символу и тарифу. Значение: GET /setting/fees/ |
| withdrawal_fee_amount | Фиксированная комиссия |
| withdrawal_fee_percentage | Процент комиссии |
| totp_code | Обязателен без API key (email OTP, 10 мин) |
Повтор запроса с тем же external_id не является идемпотентным.
Справочные эндпоинты
Справочные эндпоинты
Вспомогательные методы, на которые ссылаются операции из других разделов.
Эндпоинты
| Метод | Путь | Описание |
|---|---|---|
| GET | /symbol/ | Список символов |
| GET | /symbol/fiat/ | Список поддерживаемых фиатных валют |
| GET | /user/balance/ | Баланс по символам |
| GET | /setting/fees/ | Комиссии и лимиты |
| GET | /currency/rate/ | Курсы валютных пар |
| GET | /currency/rate/hedge/ | Курсы к USDT (источник aster_dex) |
GET /symbol/
Используйте для получения допустимых значений symbol_id при создании адреса, счёта или вывода.
Query
| Параметр | Описание |
|---|---|
| page | Номер страницы, по умолчанию 1 |
| per_page | Размер страницы, по умолчанию 100 |
| search_query | Поиск по id, name, short_name |
| order_type | symbol, short_name, name |
| order_asc | Сортировка по возрастанию, по умолчанию true |
Ответ
Пагинированный список. Каждый элемент:
| Поле | Описание |
|---|---|
| id | Идентификатор символа для API (symbol_id) |
| name | Полное название |
| short_name | Краткое название валюты |
| blockchain | Сеть: id, name, ссылки на explorer |
| is_active | Доступен ли символ |
| is_virtual | Виртуальный символ (для API не используйте) |
| group_symbol_id | Группа баланса, если символ сгруппирован |
| balance_symbol_id | Символ, по которому ведётся баланс |
| contract_address | Адрес контракта токена, если есть |
| precision | Точность |
Для запросов с symbol_id выбирайте записи с is_virtual: false и is_active: true.
GET /symbol/fiat/
Список кодов фиатных валют для поля target_currency_fiat при создании счёта.
Ответ
Массив строк, например ["USD", "EUR", ...].
GET /user/balance/
Текущий баланс аккаунта. Удобно перед созданием вывода.
Query
| Параметр | Описание |
|---|---|
| search_query | Фильтр по symbol_id |
Ответ
Массив объектов:
| Поле | Описание |
|---|---|
| symbol_id | Идентификатор символа |
| value | Доступный баланс |
Rate limit: 30 запросов в минуту.
GET /setting/fees/
Комиссии и минимальные суммы по символам.
Query
| Параметр | Описание |
|---|---|
| user_id | ID пользователя для персональных настроек |
| tariff_id | ID тарифа |
Без параметров возвращаются глобальные значения. Передайте свой user_id, чтобы получить актуальные лимиты и комиссии.
Ответ
Массив объектов по символам:
| Поле | Описание |
|---|---|
| symbol_id | Идентификатор символа |
| min_deposit_amount | Минимальный депозит |
| min_withdrawal_amount | Минимальный вывод |
| deposit_fee_amount | Фиксированная комиссия депозита |
| deposit_fee_percentage | Процент комиссии депозита |
| withdrawal_fee_amount | Фиксированная комиссия вывода |
| withdrawal_fee_percentage | Процент комиссии вывода |
GET /currency/rate/
Курсы валютных пар.
Query
| Параметр | Описание |
|---|---|
| source | Источник: coingecko или aster_dex. Без параметра — все источники |
Ответ
Массив объектов:
| Поле | Описание |
|---|---|
| from_symbol_id | symbol_id криптовалюты или код фиата (для пар фиат→фиат) |
| to_symbol_name | Код валюты котировки: фиат (USD, EUR, ...) или USDT |
| value | Курс: сколько единиц to_symbol_name за 1 единицу from_symbol_id |
| source | coingecko или aster_dex |
| created_at | Время обновления |
Примеры пар
| source | from_symbol_id | to_symbol_name | Смысл |
|---|---|---|---|
| coingecko | USDTBEP20 | USD | Криптосимвол к фиату |
| coingecko | USD | EUR | Фиат к фиату |
| aster_dex | BTC | USDT | Криптосимвол к USDT |
GET /currency/rate/hedge/
Только курсы from_symbol_id → USDT из источника aster_dex. Формат ответа совпадает с GET /currency/rate/.
Интеграция с ИИ
Интеграция с помощью ИИ
Документация Cryptoway собрана так, чтобы её можно было целиком отдать ИИ-ассистенту — ChatGPT, Claude, Gemini, Cursor, Copilot или любому другому. Он прочитает спецификацию и напишет рабочую интеграцию на PHP, Node.js, Python, Go или Rust за минуты, а не за часы.
Одна ссылка для ассистента
Вся документация, полная спецификация API и бренд-гайд собраны в один файл на английском — ИИ-модели работают с ним точнее всего.
:::copy https://docs.cryptoway.com/llms-full.txt | Скопировать ссылку | Ссылка скопирована
Скопируйте ссылку, отдайте её ассистенту и опишите задачу: на каком языке и что именно нужно интегрировать. Если ассистент не умеет ходить в интернет, откройте файл по этой ссылке и вставьте его содержимое в чат целиком.
Файл пересобирается вместе с документацией, поэтому разойтись с ней не может. Отдельно доступна спецификация openapi.json.
Готовый промпт
Полная документация платёжного API Cryptoway: https://docs.cryptoway.com/llms-full.txt
Прочитай её целиком, прежде чем писать код.

Задача: напиши интеграцию на <язык или фреймворк>, которая
1) создаёт счёт на оплату,
2) проверяет подпись входящего webhook,
3) обрабатывает статусы платежа.

Требования:
- строго следуй схеме подписи HMAC-SHA256 из раздела «Подпись»;
- используй только те эндпоинты и поля, что есть в документации, ничего не придумывай;
- ключи читай из переменных окружения, не зашивай в код;
- добавь обработку ошибок и повторные попытки на приёме webhook.
Что проверить за ассистентом
Подпись. Самое частое место, где ИИ ошибается, — порядок полей и кодирование при формировании строки для HMAC-SHA256. Сверьте результат с разделом Подпись.
Ключи. В сгенерированном коде не должно быть зашитых API-ключей и секретов — только чтение из переменных окружения.
Webhook. Проверьте, что подпись входящего уведомления действительно проверяется, а повторная доставка одного и того же события не создаёт дубль заказа.
Суммы. Криптовалютные суммы нужно считать в строках или decimal, не в числах с плавающей точкой.
Боевые ключи. Проверяйте сгенерированный код на тестовом проекте, прежде чем подключать боевые ключи.
Premium Exchange
Как подключить к 
Подключение Cryptoway к обменному пункту на скрипте Premium Exchanger (v 2.7) — двумя модулями:
- Мерчант (приём средств) — принимает средства от клиента на ваши счета и автоматически переводит заявку в статус «Оплаченная заявка».
- Автовыплата — выплачивает средства клиенту с ваших счетов.
Вместе они дают полную автоматизацию обмена. Можно подключить только один модуль — тогда автоматизируется только приём или только выплата.
Полная документация Premium Exchanger: Модули мерчантов и автовыплат
Что понадобится
- Обменник на Premium Exchanger 2.7.x. Модули несовместимы между версиями: на скрипте 2.7 нужны модули 2.7.*, иначе сайт не откроется.
- Доступ к серверу через ISP Manager из-под пользователя сайта (не root).
- Ключи Cryptoway с разрешениями на депозиты и выводы — Project ID и
secret(см. Подпись).
Шаг 1. Файлы модулей
| Модуль | Архив | Назначение |
|---|---|---|
| Мерчант (приём средств) | m_cryptoway_271.zip | Приём криптоплатежей |
| Автовыплаты | pay_cryptoway_271.zip | Автоматические выплаты |
Версия модуля должна совпадать с версией вашего скрипта Premium Exchanger (например, 271 — под 2.7.\*).
Шаг 2. Загрузка на сервер
Перед изменением файлов сделайте бэкап корневой папки сайта. Работайте через ISP Manager из-под пользователя сайта (не root).
- Папку
cryptowayиз m_cryptoway_271.zip загрузите в/wp-content/plugins/premiumbox/merchants. - Папку
cryptowayиз pay_cryptoway_271.zip загрузите в/wp-content/plugins/premiumbox/paymerchants. - При окне о совпадении файлов — нажмите «Заменить».
Шаг 3. Добавление и настройка мерчанта
В разделе «Мерчанты» → «Мерчанты» нажмите «Добавить» (часть мерчантов создана по умолчанию). Заполните форму:
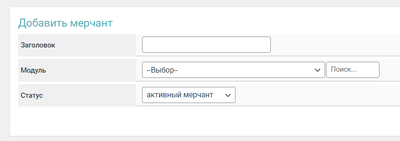
- Заголовок — название мерчанта в панели управления.
- Модуль — выберите Cryptoway из выпадающего списка.
- Статус — «активный мерчант».
В настройках модуля укажите ключи из личного кабинета Cryptoway:
- API ключ — сюда вставьте Project ID из кабинета Cryptoway.
- Секретный ключ —
secretвашего API-ключа.
Шаг 4. Автовыплаты
Модуль автовыплат подключается так же: раздел «Автовыплаты» → «Добавить», статус «активный», те же ключи Cryptoway (Project ID + secret). Привязывается на вкладке «Мерчанты и выплаты» направления — для валюты «Получаю». Перед включением ознакомьтесь с разделом «Предупреждение о рисках» в документации Premium Exchanger.
Шаг 5. Режимы работы
Изначально обменник работает в ручном режиме. С модулями:
- Только мерчант на приём — автоматизируется приём: при поступлении средств заявка переходит в «Оплаченная заявка», выплату вы делаете вручную и меняете статус на «Выполненная заявка».
- Мерчант + автовыплата — полная автоматизация: «Оплаченная заявка» → «Ожидание подтверждения от модуля автовыплат» → «Выполненная заявка».
- Можно включить кнопку «Перевести» в заявке даже для автоматизированного направления — оператор сможет выплатить вручную, если автовыплата не прошла.
Шаг 6. Проверка
Проверьте подключение встроенной «Диагностикой мерчанта» (Мерчанты → Мерчанты → диагностика):
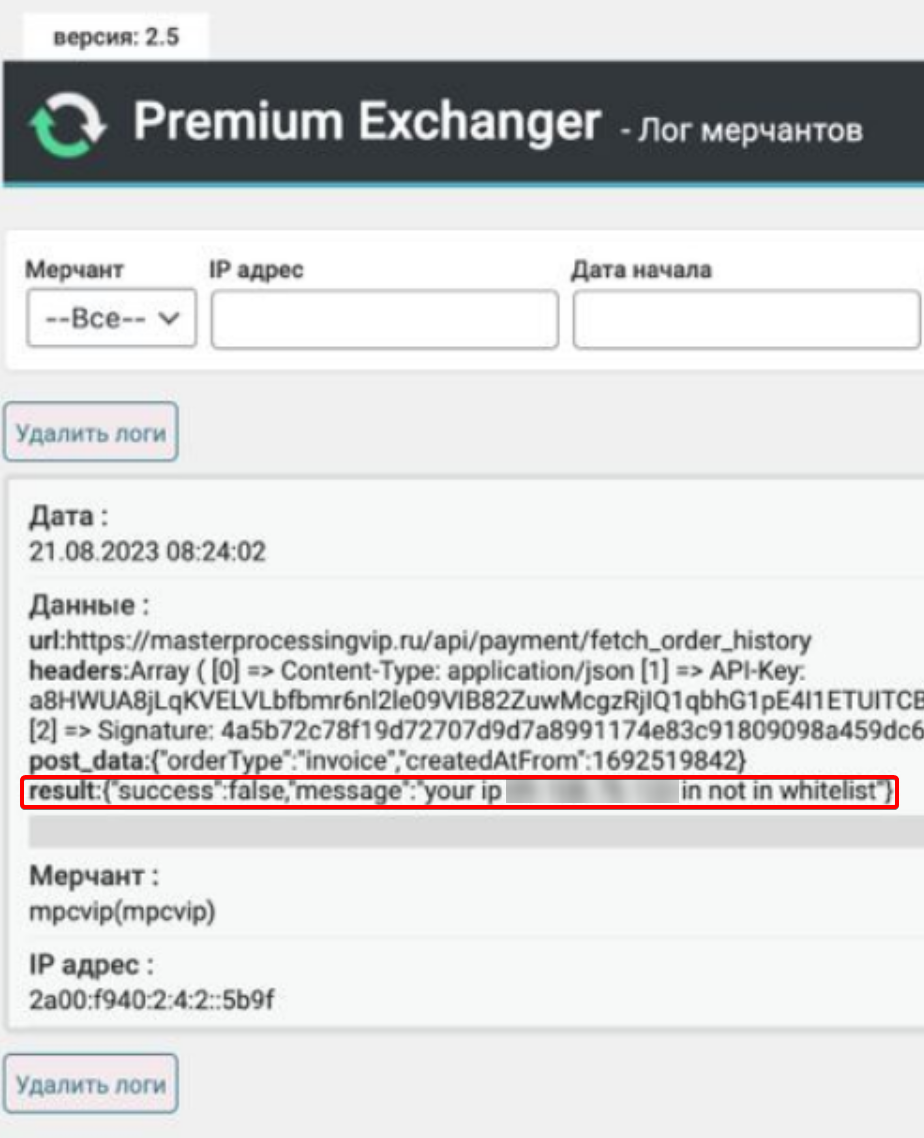
- Убедитесь, что на сервере настроен планировщик задач (cron) — без него статусы заявок не меняются автоматически.
- Если в логе ошибка вида «your IP … not in whitelist» — добавьте IP вашего сервера в whitelist API-ключа Cryptoway (параметр
allowed_ips).
iEXExchanger
Как подключить к iEXExchanger
Подключение Cryptoway к обменному пункту на скрипте iEXExchanger — через встроенный мерчант Cryptoway. После подключения iEXExchanger самостоятельно создаёт адрес для оплаты, отслеживает поступление средств и автоматически переводит заявку в следующий статус после подтверждения платежа.
Модуль поддерживает:
- создание адресов для оплаты;
- автоматическую проверку поступлений;
- webhook-уведомления;
- ручную и автоматическую проверку платежей;
- работу с несколькими блокчейн-сетями.
Важно. Перед включением мерчанта в рабочем направлении обязательно выполните тестовую оплату на небольшую сумму. Если неправильно указать API-ключ, Callback Key или сеть, адрес для оплаты может не создаться, а автоматическая обработка платежей работать не будет.
Полная документация iEXExchanger: Мерчант Cryptoway.
Что понадобится
Перед настройкой подготовьте данные из личного кабинета Cryptoway:
- Project ID
- Secret key
В модуле iEXExchanger эти поля называются по-старому — API Key ID и API Key Secret.
Для приёма криптовалюты API-ключ должен иметь разрешение Deposits. Разрешение Withdrawal предназначено для автоматических выплат — для работы мерчанта на приём оно не требуется (см. Подпись и Депозиты).
Шаг 1. Регистрация и API-ключ в Cryptoway
Создайте аккаунт или войдите в существующий на cryptoway.com. После входа:
- Перейдите в раздел «API ключи».
- Нажмите «Создать API ключ».
- Укажите произвольное название ключа.
- При необходимости укажите публичный IP-адрес вашего сервера.
- Включите разрешение Deposits.
- Подтвердите создание ключа.
- Скопируйте
Key IDиKey Secret.
Важно. Key Secret показывается только при создании ключа — повторно посмотреть его не получится. Если ключ не был сохранён, создайте новую пару ключей. Сохраните данные в безопасном месте и не передавайте их третьим лицам.
Если список разрешённых IP-адресов оставить пустым, Cryptoway может автоматически сохранить IP-адрес первого успешного API-запроса — последующие запросы будут приниматься только с этого IP.
Шаг 2. Добавление мерчанта
В админке iEXExchanger откройте «Мерчанты и API» → «Список мерчантов» и нажмите «Добавить». В списке модулей выберите Cryptoway.
Шаг 3. Настройка мерчанта
Заполните поля мерчанта:
- API Key ID — сюда вставьте Project ID из кабинета Cryptoway (формат
xxxxxxxx-xxxx-xxxx-xxxx-xxxxxxxxxxxx). Поле в модуле называется по-старому. Обязательное поле. - API Key Secret — секретная часть API-ключа. Используется для подписи запросов создания адресов оплаты, проверки поступления средств и получения списка доступных валют и сетей. Обязательное поле, без пробелов в начале и конце значения.
- API Base URL — оставьте стандартное значение
https://api.cryptoway.com. Изменяйте только по рекомендации техподдержки Cryptoway; не указывайте здесь адрес личного кабинета или домен вашего обменного пункта. - Callback Key — оставьте поле пустым.
Код валюты. Выберите код валюты и блокчейн-сети, который используется в Cryptoway, например USDTTRC20, USDTBEP20 или BNBBEP20. Использовать общий код без сети (например USDT) нельзя — Cryptoway принимает код, привязанный к конкретной блокчейн-сети. Если выбрано значение «Автоматически», система берёт код сети из настроек валюты; заранее убедитесь, что он совпадает с идентификатором валюты в Cryptoway.
Макс. время регистрации в блокчейне — задаётся в минутах, рекомендуемое значение 30. В течение этого времени система ожидает регистрацию транзакции в блокчейне.
Макс. время получения первого подтверждения — задаётся в часах, рекомендуемое значение 2. В течение этого времени система ожидает первое подтверждение транзакции.
Шаг 4. Привязка мерчанта к валюте
После сохранения мерчанта назначьте его нужной валюте. Откройте «Основное» → «Валюты» → «Список валют», выберите валюту, перейдите в раздел автоматизации и в качестве мерчанта выберите Cryptoway.
Убедитесь, что выбранная сеть соответствует сети, указанной в настройках мерчанта. Например:
Валюта: USDTСеть: TRC20Код Cryptoway: USDTTRC20Мерчант: Cryptoway
Если одна валюта используется в нескольких сетях, создайте отдельную копию мерчанта для каждой сети.
Как работает приём платежей
После создания заявки iEXExchanger автоматически отправляет запрос в API Cryptoway. Cryptoway создаёт постоянный адрес и возвращает его системе, клиент переводит средства на этот адрес. Когда платёж получает статус executed, iEXExchanger автоматически переводит заявку в следующий статус. Для связи платежа с заявкой iEXExchanger передаёт в Cryptoway идентификатор заявки.
Фактически поступившая сумма считается по значению amount — это сумма, зачисленная на баланс Cryptoway после учёта комиссии сервиса. Учитывайте комиссию Cryptoway при настройке направления обмена: сумма перевода в блокчейне может отличаться от суммы, фактически зачисленной на баланс.
Что проверить перед запуском
- поля
API Key IDиAPI Key Secretзаполнены правильно — в них Project ID и Secret key из кабинета; - для API-ключа включено разрешение Deposits;
API Base URLимеет значениеhttps://api.cryptoway.com;- код валюты и сеть указаны без ошибок, не используется код без сети (например
USDT); - backend обменника доступен по HTTPS;
- публичный IP сервера разрешён в настройках API-ключа;
- мерчант привязан к нужной валюте или направлению;
- учтены минимальная сумма и комиссия Cryptoway;
- на время тестирования включено логирование запросов.
Проверка работы
- Создайте тестовую заявку.
- Убедитесь, что появился адрес оплаты.
- Проверьте, что адрес соответствует выбранной сети.
- Отправьте небольшую сумму.
- Дождитесь обработки платежа.
- Проверьте изменение статуса заявки.
- Убедитесь, что платёж получил статус
executed. - Проверьте сохранение хеша транзакции.
- Сверьте сумму заявки с суммой, зачисленной на баланс Cryptoway.
- Проверьте журнал запросов: «Журнал событий» → «Мерчанты и API» → «Лог запросов мерчантов».
Рекомендации
- Используйте отдельный API-ключ Cryptoway для каждого обменного пункта.
- Для приёма и автоматических выплат используйте разные API-ключи.
- Не публикуйте
API Key IDиAPI Key Secretв переписках и на скриншотах. - Перед включением мерчанта в рабочих направлениях всегда выполняйте тестовую оплату.
- Проверяйте актуальную минимальную сумму депозита и комиссию для выбранной валюты.
- После успешной проверки можно отключить расширенное логирование запросов.
WooCommerce
Плагин Cryptoway для WooCommerce
Плагин добавляет приём криптовалюты в WooCommerce. Покупатель оформляет заказ в обычной кассе магазина, оплачивает счёт на странице Cryptoway и возвращается на страницу подтверждения, а статус заказа обновляется сам.
Что понадобится
- WordPress 6.9 или новее;
- PHP 8.1 или новее;
- WooCommerce 9.0 или новее;
- аккаунт Cryptoway с активным проектом.
Плагин поддерживает блочную кассу WooCommerce и новое хранилище заказов (HPOS).
Получите доступ
- Зарегистрируйтесь в личном кабинете Cryptoway.
- Откройте раздел Projects и нажмите New project.
- Заполните заявку: название проекта, адрес сайта и контакт для связи.
- Дождитесь статуса Active — заявку проверяет менеджер, обычно в течение одного рабочего дня. До проверки проект показан как In review.
- На странице проекта нажмите API keys.
- Скопируйте Project ID, Callback key и Secret key.
Важно. Ключи проекта работают только с того адреса, с которого их использовали впервые. Заведите каждому магазину отдельный проект.
Установка
Через каталог WordPress
- Откройте Плагины → Добавить новый.
- Найдите Cryptoway.
- Установите и активируйте плагин.
Загрузкой архива
- Откройте Плагины → Добавить новый → Загрузить плагин.
- Выберите архив плагина и нажмите Установить.
- Активируйте плагин.
Вручную
Загрузите папку плагина в каталог /wp-content/plugins/ и активируйте плагин в разделе Плагины.
Убедитесь, что WooCommerce установлен и активен.
Настройка способа оплаты
Откройте WooCommerce → Настройки → Платежи → Cryptoway.
| Поле | Значение |
|---|---|
| Способ оплаты | Включает оплату через Cryptoway. |
| Название при оформлении | Название способа оплаты в кассе. |
| Текст под названием | Одна строка, которую видит покупатель. Можно оставить пустым. |
| Другие языки | Название и текст для других языков сайта. |
| Project ID | Первое значение из окна Project credentials. |
| Callback key | Второе значение. Оставьте пустым — плагин получит его при сохранении. |
| Secret key | Третье значение. |
| Сколько времени на оплату | От 15 до 1440 минут. По умолчанию — 60. На это время фиксируется курс. |
| Минимальный заказ | Ниже этой суммы способ оплаты не показывается. Ноль — без ограничения. |
| Максимальный заказ | Выше этой суммы способ оплаты не показывается. Ноль — без ограничения. |
| Если покупатель не успел оплатить | Закрыть заказ или оставить его доступным для оплаты позже. |
| Тестовый режим | Заказы не отправляются в Cryptoway. Выключите перед началом продаж. |
| Подробный журнал | Включайте на время настройки. Журнал: WooCommerce → Статус → Логи. |
Сохраните изменения.
Настройка проекта
Остальное настраивается в кабинете Cryptoway: откройте проект и перейдите на вкладку Настройки.
| Раздел | Что задаёт |
|---|---|
| Автоконвертация при поступлении | Автоконвертация поступающих активов в выбранную валюту. |
| Оформление платёжной страницы | Цвет, логотип и тема страницы, на которой платит покупатель. |
| Макет платёжной страницы | Вид счёта: в одну колонку или в две. |
| Информация о проекте | Реквизиты получателя. Печатаются на счёте. |
| Комиссия и наценка | Кто платит комиссию Cryptoway и нужна ли наценка к сумме счёта. |
| Разрешённые IP | Адреса серверов, которым разрешено обращаться к API проекта. |
Важно. Новые правила комиссии и наценки действуют для счетов, созданных после изменения. Уже выставленные счета считаются по прежним.
Как проходит оплата
- Покупатель выбирает Cryptoway при оформлении заказа.
- Плагин создаёт счёт на сумму заказа и отправляет покупателя на страницу оплаты Cryptoway.
- Покупатель выбирает монету и сеть и переводит сумму.
- Плагин сверяет сумму и валюту с заказом и переводит заказ в оплаченные.
- Покупатель возвращается на страницу подтверждения заказа.
Обычно от оплаты до смены статуса проходят секунды. Если уведомление не дошло, плагин перепроверяет счёт сам в течение десяти минут.
Статусы заказа
| Что произошло | Что делает плагин |
|---|---|
| Оплачено полностью | Переводит заказ в «Обработка» и записывает в историю сумму и монету. |
| Пришло меньше суммы заказа | Ставит заказ на удержание и отмечает, что нужна проверка. Заказ не отгружается. |
| Пришло больше суммы заказа | Заказ оплачен, разница отмечена в истории. |
| Время на оплату вышло | Отменяет заказ или оставляет его доступным для оплаты — по настройке. |
| Оплата отменена | Отменяет заказ. |
| Платёж задержан проверкой безопасности | Ставит заказ на удержание до решения на стороне Cryptoway. |
| Деньги пришли по уже отменённому заказу | Ставит заказ на удержание и предупреждает в истории: товар мог вернуться на склад. |
Заказ считается оплаченным только после сверки суммы и валюты. Недоплаченный заказ не отгружается автоматически.
Проверка после настройки
- Создайте заказ на небольшую сумму.
- Выберите Cryptoway при оформлении.
- Убедитесь, что открылась страница оплаты Cryptoway.
- Оплатите счёт.
- Проверьте, что заказ перешёл в «Обработка», а в его карточке появились номер платежа, монета и хеш транзакции.
Если статус не изменился, откройте карточку заказа и нажмите проверку статуса платежа.
Диагностика
| Проблема | Что проверить |
|---|---|
| Cryptoway не появляется при оформлении | Плагин активен, способ оплаты включён, заполнены Project ID и Secret key, сумма заказа попадает в заданные границы. |
| Страница оплаты не открывается | Проект имеет статус Active, ключи скопированы из окна Project credentials без лишних пробелов. |
| Заказ не обновился после оплаты | Заполнен Callback key. Откройте карточку заказа и нажмите проверку статуса платежа. |
| Cryptoway отказывает в доступе | Ключи привязаны к адресу сервера, с которого их использовали впервые. Заведите магазину отдельный проект или очистите список в разделе «Разрешённые IP». |
| Нужны детали запросов | Включите подробный журнал и повторите заказ: WooCommerce → Статус → Логи. |
Тарифы и список монет — на сайте Cryptoway. Поддержка: @cryptoway_support_bot.
Easy Digital Downloads
Плагин Cryptoway для Easy Digital Downloads
Плагин добавляет приём криптовалюты в Easy Digital Downloads. Покупатель оформляет заказ в обычной кассе магазина, оплачивает счёт на странице Cryptoway и возвращается на страницу подтверждения, а статус заказа обновляется сам.
Что понадобится
- WordPress 6.9 или новее;
- PHP 8.1 или новее;
- Easy Digital Downloads 3.2 или новее;
- аккаунт Cryptoway с активным проектом.
Получите доступ
- Зарегистрируйтесь в личном кабинете Cryptoway.
- Откройте раздел Projects и нажмите New project.
- Заполните заявку: название проекта, адрес сайта и контакт для связи.
- Дождитесь статуса Active — заявку проверяет менеджер, обычно в течение одного рабочего дня. До проверки проект показан как In review.
- На странице проекта нажмите API keys.
- Скопируйте Project ID, Callback key и Secret key.
Важно. Ключи проекта работают только с того адреса, с которого их использовали впервые. Заведите каждому магазину отдельный проект.
Установка
Через каталог WordPress
- Откройте Плагины → Добавить новый.
- Найдите Cryptoway.
- Установите и активируйте плагин.
Загрузкой архива
- Откройте Плагины → Добавить новый → Загрузить плагин.
- Выберите архив плагина и нажмите Установить.
- Активируйте плагин.
Вручную
Загрузите папку плагина в каталог /wp-content/plugins/ и активируйте плагин в разделе Плагины.
Убедитесь, что Easy Digital Downloads установлен и активен.
Настройка способа оплаты
- Откройте Загрузки → Настройки → Платежи.
- Включите Cryptoway в списке способов оплаты.
- Перейдите в раздел Cryptoway и заполните поля.
| Поле | Значение |
|---|---|
| Название при оформлении | Название способа оплаты в кассе. |
| Текст под названием | Одна строка, которую видит покупатель. Можно оставить пустым. |
| Другие языки | Название и текст для других языков сайта. |
| Project ID | Первое значение из окна Project credentials. |
| Callback key | Второе значение. Оставьте пустым — плагин получит его при сохранении. |
| Secret key | Третье значение. |
| Время на оплату | От 15 до 1440 минут. По умолчанию — 60. На это время фиксируется курс. |
| Минимальный заказ | Ниже этой суммы способ оплаты не показывается. Ноль — без ограничения. |
| Максимальный заказ | Выше этой суммы способ оплаты не показывается. Ноль — без ограничения. |
| Подробный журнал | Включайте на время настройки. |
Сохраните изменения.
Важно. Тестовый режим в Easy Digital Downloads общий для всех способов оплаты: Загрузки → Настройки → Платежи → Тестовый режим. Пока он включён, заказы не отправляются в Cryptoway.
Настройка проекта
Остальное настраивается в кабинете Cryptoway: откройте проект и перейдите на вкладку Настройки.
| Раздел | Что задаёт |
|---|---|
| Автоконвертация при поступлении | Автоконвертация поступающих активов в выбранную валюту. |
| Оформление платёжной страницы | Цвет, логотип и тема страницы, на которой платит покупатель. |
| Макет платёжной страницы | Вид счёта: в одну колонку или в две. |
| Информация о проекте | Реквизиты получателя. Печатаются на счёте. |
| Комиссия и наценка | Кто платит комиссию Cryptoway и нужна ли наценка к сумме счёта. |
| Разрешённые IP | Адреса серверов, которым разрешено обращаться к API проекта. |
Важно. Новые правила комиссии и наценки действуют для счетов, созданных после изменения. Уже выставленные счета считаются по прежним.
Как проходит оплата
- Покупатель выбирает Cryptoway при оформлении заказа.
- Плагин создаёт счёт на сумму заказа и отправляет покупателя на страницу оплаты Cryptoway.
- Покупатель выбирает монету и сеть и переводит сумму.
- Плагин сверяет сумму и валюту с заказом и переводит заказ в оплаченные.
- Покупатель возвращается на страницу подтверждения заказа.
Обычно от оплаты до смены статуса проходят секунды. Если уведомление не дошло, плагин перепроверяет счёт сам в течение десяти минут.
Статусы заказа
| Что произошло | Что делает плагин |
|---|---|
| Оплачено полностью | Переводит заказ в «Завершён» и записывает в историю сумму и монету. |
| Пришло меньше суммы заказа | Ставит заказ в «Приостановлен» и отмечает, что нужна проверка. Доступ к файлам не выдаётся. |
| Пришло больше суммы заказа | Заказ оплачен, разница отмечена в истории. |
| Время на оплату вышло | Закрывает заказ как неоплаченный. |
| Оплата отменена | Закрывает заказ как неоплаченный. |
| Платёж задержан проверкой безопасности | Ставит заказ в «Приостановлен» до решения на стороне Cryptoway. |
| Деньги пришли по уже закрытому заказу | Ставит заказ в «Приостановлен» и предупреждает в истории. |
Заказ считается оплаченным только после сверки суммы и валюты. По недоплаченному заказу доступ к файлам не выдаётся.
Проверка после настройки
- Создайте заказ на небольшую сумму.
- Выберите Cryptoway при оформлении.
- Убедитесь, что открылась страница оплаты Cryptoway.
- Оплатите счёт.
- Проверьте, что заказ перешёл в «Завершён», а в его карточке появились номер платежа, монета и хеш транзакции.
Если статус не изменился, откройте карточку заказа и нажмите проверку статуса платежа.
Диагностика
| Проблема | Что проверить |
|---|---|
| Cryptoway не появляется при оформлении | Плагин активен, шлюз включён в списке способов оплаты, заполнены Project ID и Secret key, сумма заказа попадает в заданные границы. |
| Страница оплаты не открывается | Проект имеет статус Active, ключи скопированы из окна Project credentials без лишних пробелов. |
| Заказ не обновился после оплаты | Заполнен Callback key. Откройте карточку заказа и нажмите проверку статуса платежа. |
| Cryptoway отказывает в доступе | Ключи привязаны к адресу сервера, с которого их использовали впервые. Заведите магазину отдельный проект или очистите список в разделе «Разрешённые IP». |
| Нужны детали запросов | Включите подробный журнал и повторите заказ. |
Тарифы и список монет — на сайте Cryptoway. Поддержка: @cryptoway_support_bot.
Introduction
API Integration
Endpoint: https://api.cryptoway.com
The Cryptoway API is signed with HMAC-SHA256. The documentation is split into four sections:
Signing
Signing
Keys
| Key | Where to find it | Purpose |
|---|---|---|
| Project ID + secret | Dashboard → API keys | Signing API requests |
| callback_key | Dashboard → profile | Verifying webhooks |
For webhooks, use callback_key — not the secret API key.
Getting API keys
A single API key works for every API method, as long as you enable the permissions it needs when you create it.
Key creation parameters
| Parameter | Description |
|---|---|
| description | Key name |
| allowed_ips | List of allowed IPs. Can be left empty |
| is_deposit_allowed | Allow deposit operations |
| is_withdrawal_allowed | Allow withdrawals |
If allowed_ips is empty, the first successful API request automatically adds the current IP to the list.
Steps
- Sign up for the service.
- Open the API keys tab.
- Click Create API key.
- Set the name, permissions, and IPs in the form.
- Copy the keys from the modal right away — the secret is shown only once.
- Done.
In your requests, use the Project ID as X-API-Key-ID and the secret for signing. The header name has not changed: the dashboard calls the value Project ID, and it travels in X-API-Key-ID.
callback_key
The webhook verification key lives in your dashboard profile. It is not the same as the secret API key.
Request headers
| Header | Description |
|---|---|
X-API-Key-ID | Project ID (UUID) |
X-Timestamp | Unix timestamp, seconds |
X-Signature | HMAC-SHA256 hex |
A signature is required for every public endpoint (GET, POST, and others).
Signing algorithm
- Build the object:
{
  "params": "url_encoded_query_string",
  "body": {},
  "path": "/user/balance/"
}params— the query string exactly as it appears in the URL (search_query=foo, without the?)body— the JSON request body;{}when there is no bodypath— the request path, e.g./user/balance/
- Serialize the object:
json.dumps(data, separators=(",", ":"), sort_keys=True) - Sign it:
signature = HMAC-SHA256(key=API_KEY_SECRET, message=timestamp + json_string)- The timestamp must be within ±15 seconds of server time.
If the key's allowlist is empty, the first successful request records the current IP in the allowlist. After that, only requests from a listed IP are accepted.
Example: GET balance
# empty params, body {}
# path = /user/balance/
# data = {"body":{},"params":"","path":"/user/balance/"}

curl "https://api.cryptoway.com/user/balance/" \
  -H "X-API-Key-ID: <PROJECT_ID>" \
  -H "X-Timestamp: 1718659200" \
  -H "X-Signature: <hex>"
Example: POST address
curl "https://api.cryptoway.com/user/address/" \
  -X POST \
  -H "Content-Type: application/json" \
  -H "X-API-Key-ID: <PROJECT_ID>" \
  -H "X-Timestamp: 1718659200" \
  -H "X-Signature: <hex>" \
  -d '{"symbol_id":"USDTBEP20","callback_url":"https://example.com/cb","description":"shop"}'
Generating a signature
:::tabs
import hashlib, hmac, json, time

def sign(key: str, timestamp: int, data: dict) -> str:
    s = json.dumps(data, separators=(",", ":"), sort_keys=True)
    return hmac.new(key.encode(), f"{timestamp}{s}".encode(), hashlib.sha256).hexdigest()

data = {"params": "", "body": {"symbol_id": "USDTBEP20"}, "path": "/user/address/"}
ts = int(time.time())
signature = sign(API_KEY_SECRET, ts, data)
$data = ["params" => "", "body" => ["symbol_id" => "USDTBEP20"], "path" => "/user/address/"];
ksort($data);
$json = json_encode($data, JSON_UNESCAPED_SLASHES);
$signature = hash_hmac("sha256", time() . $json, $API_KEY_SECRET);:::
Verifying a webhook signature
A POST is sent to your callback_url.
Headers:
| Header | Description |
|---|---|
X-Signature | HMAC-SHA256 hex |
X-Timestamp | Unix timestamp |
Data to sign:
{
  "params": "",
  "body": { }
}params— the query string of your endpointbody— the parsed JSON POST body- the
pathfield is not used - the signature uses
callback_key
Allowed timestamp drift: ±15 seconds.
Deposit / withdrawal webhook
The POST body is the transaction object as JSON (fields are described below). To verify the signature, place this object in the body field and leave params empty.
Invoice webhook
{
  "params": "",
  "body": {
    "type": "invoice",
    "id": "5ca38db1-00c5-4aba-91e5-6a57bed60aee",
    "status": "executed"
  }
}
The POST body is identical to the object you sign: params and body at the top level. To verify the signature, use the entire parsed request body as-is, with no extra wrapper.
Verifying webhooks in Python
Deposit and withdrawal webhooks:
body = await request.json()
data = {"params": request.url.query, "body": body}
verify(request.headers["X-Signature"], CALLBACK_KEY, int(request.headers["X-Timestamp"]), data)
Invoice webhook:
data = await request.json()
verify(request.headers["X-Signature"], CALLBACK_KEY, int(request.headers["X-Timestamp"]), data)
Shared verify helper:
def verify(signature: str, key: str, timestamp: int, data: dict) -> bool:
    if abs(int(time.time()) - timestamp) > 15:
        return False
    expected = sign(key, timestamp, data)
    return hmac.compare_digest(expected, signature)
Deposits
Deposits
A deposit is registered after an on-chain transfer to an address you obtained through the API. The blockchain scanner creates a transaction with the deposit type.
Getting started
Before you integrate, create an API key (see the Signing section). Without a key, API requests won't go through.
Choosing an integration type
There are two ways to accept deposits.
Invoice
Best for charging a fixed amount for a product or service.
Create one with POST /invoice/. Set the amount in fiat (target_value_fiat) or in crypto (target_value_symbol).
Symbol and address
- If you pass
symbol_idat creation, an address and apay_urlare generated right away. - If you omit
symbol_id, the payer picks the symbol and network on the payment page. The address appears once they choose.
Notifications
| Event | Webhook |
|---|---|
| On-chain transfer received | Deposit webhook: amount, hash, transaction status |
| Invoice amount collected | Invoice webhook: status: executed |
| Invoice expired before full payment | Invoice webhook: status: expired |
Invoice statuses: active, executed, expired, cancelled. There are no intermediate partial-payment statuses (paid_over, wrong_amount, etc.). Partial transfers arrive as separate deposit webhooks; the invoice moves to executed once the deposits add up to the target, or to expired at deadline_at.
Permanent address
Best for topping up a balance with no fixed amount.
Create one with POST /user/address/. Pass symbol_id and, optionally, external_id (your own identifier for the address).
You can send transfers of any amount above min_deposit_amount to the address. Each transfer creates a deposit and its own webhook.
Overall flow
- Create an invoice or a permanent address.
- The payer sends an on-chain transfer.
- The scanner registers the deposit. If a
callback_urlis set, a webhook is sent.
Endpoints
| Method | Path | Description |
|---|---|---|
| POST | /user/address/ | Permanent address |
| GET | /user/address/ | List of addresses |
| GET | /user/address/balance/{symbol_id}/ | Latest balance top-up address for a symbol |
| POST | /invoice/ | Invoice with an address |
| GET | /invoice/ | List of invoices |
| GET | /invoice/my/{invoice_id}/ | A single invoice |
| GET | /invoice/{invoice_id}/transactions/ | Deposits for an invoice |
| GET | /user/transaction/ | History (type=deposit) |
| GET | /user/transaction/{encoded_id}/ | A single transaction |
POST /user/address/
Request
| Field | Type | Description |
|---|---|---|
| symbol_id* | string | Symbol identifier: a currency on a specific network, e.g. USDTBEP20, BNBBEP20. For the list of values, see GET /symbol/ (Reference) |
| callback_url | string | URL for the deposit webhook |
| description | string | Address label |
| external_id | string | Your ID |
Virtual symbols (USDT) are not accepted. Always pass a network-bound symbol.
Response
| Field | Description |
|---|---|
| id | Address ID |
| value | Wallet address |
| symbol_id | Symbol identifier |
| callback_url | Webhook URL |
| external_id | Your ID |
| created_at | Creation date |
POST /invoice/
Request
| Field | Type | Description |
|---|---|---|
| name* | string | Name |
| symbol_id | string | Symbol identifier for the payment |
| target_value_fiat | decimal | Amount in fiat |
| target_currency_fiat | string | Fiat currency, USD by default |
| target_value_symbol | decimal | Amount in crypto |
| deadline_at | datetime | Invoice expiry |
| callback_url | string | URL for the invoice status webhook |
| external_id | string | Your ID |
| is_payer_fee | bool | The payer covers the fee |
| description | string | Description |
You must set either target_value_fiat or target_value_symbol.
Response
The payment address is in target_wallet.value, the current status, and the payment link in pay_url.
GET /user/transaction/
Filters for deposits:
| Parameter | Description |
|---|---|
| type | deposit |
| symbol_id | Symbol identifier |
| external_id | Your ID |
| status | pending, executed, dirty_lock, cancelled |
| in_processing | true — in-progress transactions only; false — completed |
| begin_at, end_at | Date range |
Deposit webhook
A POST to the callback_url you set when creating the address. For invoice deposits, the invoice's callback_url is used.
Body (main fields):
| Field | Description |
|---|---|
| type | deposit |
| status | Transaction status |
| symbol_id | Symbol identifier |
| amount | Amount credited to the balance |
| service_fee | Service fee |
| net_amount | On-chain transfer amount (amount + service_fee) |
| blockchain_data.hash | Tx hash |
| blockchain_data.from_address | Sender |
| blockchain_data.to_address | Recipient (your address) |
| external_id | Your ID from the address |
| invoice | Invoice data, if the deposit is for an invoice |
| aml_order | AML status, if the check is enabled |
| callback_order | Status of the latest webhook delivery (last_status_code, last_response_data) |
Example
{
  "user_id": 1,
  "type": "deposit",
  "created_at": "2025-11-20T16:08:10.180830+00:00",
  "symbol_id": "USDTBEP20",
  "status": "executed",
  "amount": "4.696700000000000000",
  "service_fee": "0.803300000000000000",
  "net_amount": "5.500000000000000000",
  "blockchain_data": {
    "hash": "0xabc...",
    "from_address": "0x123",
    "to_address": "0x456"
  },
  "external_id": null,
  "callback_url": "https://example.com/cb"
}
Invoice webhook
A separate callback fires when the invoice status changes (executed, expired). The body format and signature verification are covered under Invoice webhook in the Signing section.
Deposit statuses
| status | Description |
|---|---|
| pending | Awaiting AML or network confirmations |
| executed | Credited to the balance |
| dirty_lock | Address flagged dirty, deposit locked |
| cancelled | Cancelled |
Invoice statuses
| status | Description |
|---|---|
| active | Awaiting payment |
| executed | Paid |
| expired | Expired |
| cancelled | Cancelled |
Webhook delivery
If your server responds with an error, the webhook is retried automatically.
If your server already returned 2xx to the first webhook, no retry is sent when the status later changes to executed. With AML or pending confirmations, the first webhook may arrive with the pending status.
Query the current transaction status via GET /user/transaction/ or GET /user/transaction/{encoded_id}/.
Minimum amount
Deposits below min_deposit_amount are ignored. For the current value, see GET /setting/fees/ (Reference).
Withdrawals
Withdrawals
Endpoints
| Method | Path | Description |
|---|---|---|
| POST | /user/balance/withdrawal/ | Create a withdrawal |
| GET | /user/transaction/?type=withdrawal | History and status |
| GET | /user/transaction/{encoded_id}/ | A single transaction |
There is no separate GET /withdrawal/{id}. Use the transaction API.
POST /user/balance/withdrawal/
Query
| Parameter | Description |
|---|---|
| totp_code | Email OTP. Not required when authenticating with an API key |
Request
| Field | Type | Description |
|---|---|---|
| symbol_id* | string | Symbol identifier, e.g. USDTTRC20. For the list of values, see GET /symbol/ (Reference) |
| to_address* | string | Recipient address |
| amount* | decimal | Amount to the recipient (net) |
| external_id | string | Your ID |
| callback_url | string | Webhook URL |
| extra.memo | string | Memo/tag (if the network supports it) |
Virtual symbols are not accepted.
The fee is charged on top of amount. Your balance is debited by amount + service_fee.
Response
A transaction object as JSON: "type": "withdrawal", the current withdrawal status in status, and the identifier in encoded_id.
Errors
| detail | Reason |
|---|---|
| Insufficient balance | Not enough funds |
| Invalid address | Invalid address |
| Minimum withdrawal amount is ... | Below the minimum |
| TOTP code is required | totp_code required without an API key |
| MEMO doesn't supported on this chain! | Memo not supported |
Rate limit: 15 requests per 15 seconds.
GET /user/transaction/
| Parameter | Description |
|---|---|
| type | withdrawal |
| status | Withdrawal status |
| in_processing | true — in-progress withdrawals only |
| external_id | Your ID |
Withdrawal webhook
Sent once, when the withdrawal moves to the executed status.
Body
A transaction object as JSON with "type": "withdrawal". The fields match the deposit webhook object.
| Field | Description |
|---|---|
| amount | Transaction amount (recipient + fee) |
| service_fee | Fee |
| net_amount | Amount to the recipient (amount - service_fee) |
| status | executed |
| blockchain_data.hash | Tx hash |
| to_address | Recipient address |
| memo | Memo, if any |
| external_id | Your ID |
The signature is verified with callback_key, using the X-Signature and X-Timestamp headers and the data structure with params and body.
Withdrawal statuses
| status | Description |
|---|---|
| compliance_approve_required | Awaiting manual approval |
| created | Queued |
| aml_order_pending | AML check |
| prepare_pending | Preparing the transaction |
| ready_to_transfer | Ready to send |
| transfer_lock | Sending to the network |
| pending | Awaiting confirmations |
| swap_lock | Awaiting autoswap |
| executed | Completed |
| cancelled | Cancelled by an admin |
| cancelled_by_risk | Cancelled by AML |
| failed | Failed |
The in_processing=true filter returns every status except executed, cancelled, cancelled_by_risk, and failed.
Limits
| Parameter | Description |
|---|---|
| min_withdrawal_amount | Minimum per symbol and tariff. For the value, see GET /setting/fees/ |
| withdrawal_fee_amount | Fixed fee |
| withdrawal_fee_percentage | Percentage fee |
| totp_code | Required without an API key (email OTP, 10 min) |
Repeating a request with the same external_id is not idempotent.
Reference
Reference
Helper methods that the operations in the other sections rely on.
Endpoints
| Method | Path | Description |
|---|---|---|
| GET | /symbol/ | List of symbols |
| GET | /symbol/fiat/ | List of supported fiat currencies |
| GET | /user/balance/ | Balance by symbol |
| GET | /setting/fees/ | Fees and limits |
| GET | /currency/rate/ | Currency pair rates |
| GET | /currency/rate/hedge/ | Rates to USDT (source: aster_dex) |
GET /symbol/
Use it to get valid symbol_id values when creating an address, invoice, or withdrawal.
Query
| Parameter | Description |
|---|---|
| page | Page number, 1 by default |
| per_page | Page size, 100 by default |
| search_query | Search by id, name, short_name |
| order_type | symbol, short_name, name |
| order_asc | Ascending order, true by default |
Response
A paginated list. Each item:
| Field | Description |
|---|---|
| id | Symbol identifier for the API (symbol_id) |
| name | Full name |
| short_name | Short currency name |
| blockchain | Network: id, name, explorer links |
| is_active | Whether the symbol is available |
| is_virtual | Virtual symbol (don't use for the API) |
| group_symbol_id | Balance group, if the symbol is grouped |
| balance_symbol_id | Symbol the balance is kept in |
| contract_address | Token contract address, if any |
| precision | Precision |
For symbol_id requests, pick records with is_virtual: false and is_active: true.
GET /symbol/fiat/
A list of fiat currency codes for the target_currency_fiat field when creating an invoice.
Response
An array of strings, e.g. ["USD", "EUR", ...].
GET /user/balance/
The account's current balance. Handy before creating a withdrawal.
Query
| Parameter | Description |
|---|---|
| search_query | Filter by symbol_id |
Response
An array of objects:
| Field | Description |
|---|---|
| symbol_id | Symbol identifier |
| value | Available balance |
Rate limit: 30 requests per minute.
GET /setting/fees/
Fees and minimum amounts by symbol.
Query
| Parameter | Description |
|---|---|
| user_id | User ID for personalized settings |
| tariff_id | Tariff ID |
Without parameters, global values are returned. Pass your user_id to get your actual limits and fees.
Response
An array of objects by symbol:
| Field | Description |
|---|---|
| symbol_id | Symbol identifier |
| min_deposit_amount | Minimum deposit |
| min_withdrawal_amount | Minimum withdrawal |
| deposit_fee_amount | Fixed deposit fee |
| deposit_fee_percentage | Deposit fee percentage |
| withdrawal_fee_amount | Fixed withdrawal fee |
| withdrawal_fee_percentage | Withdrawal fee percentage |
GET /currency/rate/
Currency pair rates.
Query
| Parameter | Description |
|---|---|
| source | Source: coingecko or aster_dex. Without the parameter — all sources |
Response
An array of objects:
| Field | Description |
|---|---|
| from_symbol_id | The crypto symbol_id, or a fiat code (for fiat→fiat pairs) |
| to_symbol_name | Quote currency code: fiat (USD, EUR, ...) or USDT |
| value | Rate: how many units of to_symbol_name per 1 unit of from_symbol_id |
| source | coingecko or aster_dex |
| created_at | Update time |
Example pairs
| source | from_symbol_id | to_symbol_name | Meaning |
|---|---|---|---|
| coingecko | USDTBEP20 | USD | Crypto symbol to fiat |
| coingecko | USD | EUR | Fiat to fiat |
| aster_dex | BTC | USDT | Crypto symbol to USDT |
GET /currency/rate/hedge/
Only from_symbol_id → USDT rates from the aster_dex source. The response format matches GET /currency/rate/.
AI integration
Integrating with the help of AI
The Cryptoway documentation is built so that you can hand it to an AI assistant in one piece — ChatGPT, Claude, Gemini, Cursor, Copilot or any other. It reads the specification and writes a working integration in PHP, Node.js, Python, Go or Rust in minutes rather than hours.
One link for your assistant
The complete documentation, the full API specification and the brand guide are bundled into a single file.
:::copy https://docs.cryptoway.com/llms-full.txt | Copy the link | Link copied
Copy the link, hand it to your assistant and describe the task: which language you need and what exactly to integrate. If your assistant cannot browse the web, open the file at that link and paste its contents into the chat instead.
The file is rebuilt together with the documentation, so it cannot drift out of sync with it. The specification is also available on its own as openapi.json.
A ready-made prompt
The complete documentation of the Cryptoway payment API: https://docs.cryptoway.com/llms-full.txt
Read it in full before writing any code.

Task: write an integration in <language or framework> that
1) creates a payment invoice,
2) verifies the signature of an incoming webhook,
3) handles payment statuses.

Requirements:
- follow the HMAC-SHA256 signing scheme from the "Signing" section exactly;
- use only the endpoints and fields present in the documentation, invent nothing;
- read keys from environment variables, never hardcode them;
- add error handling and retries on the webhook receiver.
What to double-check after the assistant
Signing. The most common mistake an AI makes is the field order and encoding used to build the HMAC-SHA256 string. Verify the result against the Signing section.
Keys. The generated code must not contain hardcoded API keys or secrets — only reads from environment variables.
Webhooks. Make sure the incoming notification signature is actually verified and that a redelivery of the same event does not create a duplicate order.
Amounts. Crypto amounts must be handled as strings or decimals, never as floating-point numbers.
Live keys. Test the generated code on a sandbox project before you plug in live keys.
Premium Exchange
How to connect to
Connect Cryptoway to an exchange running the Premium Exchanger (v 2.7) script via two modules:
- Merchant (incoming payments) — receives the client's funds into your accounts and automatically moves the order to the “Paid order” status.
- Auto-payout — pays the client out from your accounts.
Together they fully automate the exchange. You can connect just one module to automate only the accept side or only the payout side.
Full Premium Exchanger documentation: Merchant and auto-payout modules
What you need
- An exchanger on Premium Exchanger 2.7.x. Modules are version-locked: a 2.7 script needs 2.7.* modules, otherwise the site won't load.
- Server access via ISP Manager as the site user (not root).
- Cryptoway keys with deposit + withdrawal permissions — the Project ID and
secret(see Signing).
Step 1. Module files
| Module | Archive | Purpose |
|---|---|---|
| Merchant (incoming payments) | m_cryptoway_271.zip | Accept crypto payments |
| Auto-payouts | pay_cryptoway_271.zip | Automatic payouts |
The module version must match your Premium Exchanger script version (e.g. 271 for 2.7.\*).
Step 2. Upload to the server
Back up the site root folder first. Work through ISP Manager as the site user (not root).
- Upload the
cryptowayfolder from m_cryptoway_271.zip to/wp-content/plugins/premiumbox/merchants. - Upload the
cryptowayfolder from pay_cryptoway_271.zip to/wp-content/plugins/premiumbox/paymerchants. - If a file-conflict dialog appears, click “Replace”.
Step 3. Add and configure the merchant
In “Merchants” → “Merchants” click “Add” (some merchants exist by default). Fill the form:
- Title — the merchant name shown in the admin panel.
- Module — pick Cryptoway from the dropdown.
- Status — set “active merchant”.
In the module settings, enter the keys from your Cryptoway dashboard:
- API key — paste the Project ID from your Cryptoway dashboard here.
- Secret key — your API key's
secret.
Step 4. Auto-payouts
The auto-payout module is connected the same way: the “Auto-payouts” section → “Add”, status “active”, the same Cryptoway keys (Project ID + secret). It is bound on the “Merchants and payouts” tab of the direction — for the “You get” currency. Before enabling it, read the “Risk warning” section of the Premium Exchanger docs.
Step 5. Operation modes
The exchanger starts in manual mode. With the modules:
- Merchant only (accept) — accepting is automated: when funds arrive the order moves to “Paid order”, and you pay out manually and set the status to “Completed order”.
- Merchant + auto-payout — full automation: “Paid order” → “Awaiting confirmation from the auto-payout module” → “Completed order”.
- You can enable the “Transfer” button on an order even for an automated direction, so an operator can pay out manually if an auto-payout fails.
Step 6. Verify
Check the connection with the built-in “Merchant diagnostics” (Merchants → Merchants → diagnostics):
- Make sure the server's task scheduler (cron) is configured — without it order statuses won't change automatically.
- If the log shows a “your IP … not in whitelist” error, add your server's IP to the Cryptoway API key whitelist (the
allowed_ipsparameter).
iEXExchanger
How to connect to iEXExchanger
Connect Cryptoway to an exchange running the iEXExchanger script via the built-in Cryptoway merchant. Once connected, iEXExchanger creates the payment address itself, watches for incoming funds and automatically moves the order to the next status after the payment is confirmed.
The module supports:
- creating payment addresses;
- automatic detection of incoming funds;
- webhook notifications;
- manual and automatic payment checks;
- working with several blockchain networks.
Important. Before enabling the merchant on a live direction, always run a test payment for a small amount. If the API key, Callback Key or network is set incorrectly, the payment address may not be created and automatic processing won't work.
Full iEXExchanger documentation: Cryptoway merchant.
What you need
Before configuring, prepare the data from your Cryptoway dashboard:
- Project ID
- Secret key
In the iEXExchanger module these fields still carry the old names, API Key ID and API Key Secret.
To accept crypto, the API key must have the Deposits permission. The Withdrawal permission is for automatic payouts and is not required for an accept-only merchant (see Signing and Deposits).
Step 1. Register and create an API key in Cryptoway
Create an account or sign in at cryptoway.com. Then:
- Open the “API keys” section.
- Click “Create API key”.
- Enter any name for the key.
- Optionally specify your server's public IP address.
- Enable the Deposits permission.
- Confirm the key creation.
- Copy the
Key IDandKey Secret.
Important. The Key Secret is shown only once, at creation — you can't view it again. If you didn't save it, create a new key pair. Store the data securely and never share it with third parties.
If you leave the allowed-IP list empty, Cryptoway may automatically save the IP of the first successful API request — subsequent requests will only be accepted from that IP.
Step 2. Add the merchant
In the iEXExchanger admin, open “Merchants and API” → “Merchant list” and click “Add”. Pick Cryptoway from the module list.
Step 3. Configure the merchant
Fill in the merchant fields:
- API Key ID — paste the Project ID from your Cryptoway dashboard here (format
xxxxxxxx-xxxx-xxxx-xxxx-xxxxxxxxxxxx). The module still uses the old field name. Required. - API Key Secret — the secret part of the API key. It signs the requests that create payment addresses, check incoming funds and fetch the list of available currencies and networks. Required, with no leading or trailing spaces.
- API Base URL — leave the default value
https://api.cryptoway.com. Change it only if Cryptoway technical support tells you to; don't put your dashboard address or your exchanger domain here. - Callback Key — leave empty.
Currency code. Pick the currency-and-network code used in Cryptoway, e.g. USDTTRC20, USDTBEP20 or BNBBEP20. A bare currency code without a network (e.g. USDT) is not allowed — Cryptoway accepts a code bound to a specific blockchain network. If “Automatic” is selected, the system uses the network code from the currency settings; make sure in advance that it matches the currency identifier in Cryptoway.
Max blockchain registration time — set in minutes, recommended value 30. This is how long the system waits for the transaction to register on the blockchain.
Max time to first confirmation — set in hours, recommended value 2. This is how long the system waits for the first transaction confirmation.
Step 4. Bind the merchant to a currency
After saving the merchant, assign it to the right currency. Open “Main” → “Currencies” → “Currency list”, pick the currency, go to the automation section and select Cryptoway as the merchant.
Make sure the selected network matches the network set in the merchant settings. For example:
Currency: USDTNetwork: TRC20Cryptoway code: USDTTRC20Merchant: Cryptoway
If one currency is used on several networks, create a separate copy of the merchant for each network.
How payment acceptance works
When an order is created, iEXExchanger sends a request to the Cryptoway API. Cryptoway creates a permanent address and returns it to the system, and the client transfers funds to that address. When the payment reaches the executed status, iEXExchanger automatically moves the order to the next status. To link the payment to the order, iEXExchanger passes the order identifier to Cryptoway.
The amount actually received is taken from the amount value — the sum credited to the Cryptoway balance after the service fee. Account for the Cryptoway fee when configuring the exchange direction: the on-chain transfer amount may differ from the amount actually credited to the balance.
What to check before launch
- the
API Key IDandAPI Key Secretfields are filled in correctly — they hold the Project ID and Secret key from the dashboard; - the Deposits permission is enabled for the API key;
API Base URLishttps://api.cryptoway.com;- the currency code and network are set without errors, and no network-less code (e.g.
USDT) is used; - the exchanger backend is reachable over HTTPS;
- the server's public IP is allowed in the API key settings;
- the merchant is bound to the right currency or direction;
- the Cryptoway minimum amount and fee are accounted for;
- request logging is enabled during testing.
Verifying the setup
- Create a test order.
- Make sure a payment address appears.
- Check that the address matches the selected network.
- Send a small amount.
- Wait for the payment to be processed.
- Check that the order status changes.
- Make sure the payment reaches the
executedstatus. - Check that the transaction hash is saved.
- Reconcile the order amount with the amount credited to the Cryptoway balance.
- Check the request log: “Event log” → “Merchants and API” → “Merchant request log”.
Recommendations
- Use a separate Cryptoway API key for each exchanger.
- Use different API keys for accepting payments and for automatic payouts.
- Never publish
API Key IDandAPI Key Secretin chats or screenshots. - Always run a test payment before enabling the merchant on live directions.
- Check the current minimum deposit amount and fee for the selected currency.
- Once verified, you can turn off verbose request logging.
WooCommerce
Cryptoway plugin for WooCommerce
The plugin adds crypto payments to WooCommerce. The customer places an order in the store's usual checkout, pays the invoice on the Cryptoway page and returns to the confirmation page, while the order status updates on its own.
What you need
- WordPress 6.9 or newer;
- PHP 8.1 or newer;
- WooCommerce 9.0 or newer;
- a Cryptoway account with an active project.
The plugin supports the WooCommerce block checkout and High-Performance Order Storage (HPOS).
Get access
- Sign up in the Cryptoway dashboard.
- Open Projects and click New project.
- Fill in the request: project name, site address and a contact.
- Wait for the Active status. A manager reviews the request, usually within one business day. Until then the project shows as In review.
- On the project page click API keys.
- Copy the Project ID, Callback key and Secret key.
Important. Project keys only work from the address they were first used from. Set up a separate project for each store.
Installation
From the WordPress catalogue
- Open Plugins → Add New.
- Search for Cryptoway.
- Install and activate the plugin.
By uploading the archive
- Open Plugins → Add New → Upload Plugin.
- Pick the plugin archive and click Install.
- Activate the plugin.
Manually
Upload the plugin folder to /wp-content/plugins/ and activate the plugin under Plugins.
Make sure WooCommerce is installed and active.
Payment method settings
Open WooCommerce → Settings → Payments → Cryptoway.
| Field | Value |
|---|---|
| Payment method | Turns on payments through Cryptoway. |
| Checkout title | The name of the payment method at checkout. |
| Text under the title | One line the customer sees. Can be left empty. |
| Other languages | Title and text for the site's other languages. |
| Project ID | The first value from the Project credentials window. |
| Callback key | The second value. Leave it empty and the plugin will fetch it on save. |
| Secret key | The third value. |
| Time to pay | From 15 to 1440 minutes. 60 by default. The rate is fixed for this period. |
| Minimum order | Below this amount the payment method is hidden. Zero means no limit. |
| Maximum order | Above this amount the payment method is hidden. Zero means no limit. |
| Detailed log | Turn it on while you set things up. |
Save the changes.
Important. Test mode in WooCommerce is shared by all payment methods. While it is on, orders are not sent to Cryptoway.
Project settings
The rest is configured in the Cryptoway dashboard: open the project and go to the Settings tab.
| Section | What it sets |
|---|---|
| Auto-conversion on receipt | Converts incoming assets into the currency you choose. |
| Payment page appearance | Colour, logo and theme of the page the customer pays on. |
| Payment page layout | Invoice view: one column or two. |
| Project information | The recipient's details. They are printed on the invoice. |
| Fee and markup | Who pays the Cryptoway fee and whether a markup is added to the invoice. |
| Allowed IPs | Server addresses allowed to call the project's API. |
Important. New fee and markup rules apply to invoices created after the change. Invoices already issued are settled by the previous rules.
How a payment goes through
- The customer picks Cryptoway at checkout.
- The plugin creates an invoice for the order amount and sends the customer to the Cryptoway payment page.
- The customer picks a coin and a network and sends the amount.
- The plugin matches the amount and currency against the order and marks the order paid.
- The customer returns to the order confirmation page.
It usually takes seconds from payment to the status change. If the notification does not arrive, the plugin re-checks the invoice itself within ten minutes.
Order statuses
| What happened | What the plugin does |
|---|---|
| Paid in full | Moves the order to «Processing» and records the amount and coin in the history. |
| Less than the order amount arrived | Puts the order on hold and flags it for review. The order is not shipped. |
| More than the order amount arrived | The order is paid, the difference is noted in the history. |
| Time to pay ran out | Cancels the order or leaves it payable, depending on your setting. |
| Payment cancelled | Cancels the order. |
| Payment held by a security check | Puts the order on hold until Cryptoway decides. |
| Money arrived for an already cancelled order | Puts the order on hold and warns in the history: the goods may have returned to stock. |
An order counts as paid only after the amount and currency are matched. An underpaid order is not shipped automatically.
Checking after setup
- Create a small test order.
- Pick Cryptoway at checkout.
- Make sure the Cryptoway payment page opens.
- Pay the invoice.
- Check that the order moved to «Processing» and that the payment number, coin and transaction hash appeared in its card.
If the status has not changed, open the order card and run the payment status check.
Troubleshooting
| Problem | What to check |
|---|---|
| Cryptoway does not appear at checkout | The plugin is active, the payment method is enabled, Project ID and Secret key are filled in, the order amount falls within the limits you set. |
| The payment page does not open | The project has the Active status, the keys were copied from the Project credentials window without stray spaces. |
| The order did not update after payment | The Callback key is filled in. Open the order card and run the payment status check. |
| Cryptoway denies access | Keys are bound to the server address they were first used from. Set up a separate project for the store or clear the list under «Allowed IPs». |
| You need request details | Turn on the detailed log and repeat the order: WooCommerce → Status → Logs. |
Rates and the coin list are on the Cryptoway site. Support: @cryptoway_support_bot.
Easy Digital Downloads
Cryptoway plugin for Easy Digital Downloads
The plugin adds crypto payments to Easy Digital Downloads. The customer places an order in the store's usual checkout, pays the invoice on the Cryptoway page and returns to the confirmation page, while the order status updates on its own.
What you need
- WordPress 6.9 or newer;
- PHP 8.1 or newer;
- Easy Digital Downloads 3.2 or newer;
- a Cryptoway account with an active project.
Get access
- Sign up in the Cryptoway dashboard.
- Open Projects and click New project.
- Fill in the request: project name, site address and a contact.
- Wait for the Active status. A manager reviews the request, usually within one business day. Until then the project shows as In review.
- On the project page click API keys.
- Copy the Project ID, Callback key and Secret key.
Important. Project keys only work from the address they were first used from. Set up a separate project for each store.
Installation
From the WordPress catalogue
- Open Plugins → Add New.
- Search for Cryptoway.
- Install and activate the plugin.
By uploading the archive
- Open Plugins → Add New → Upload Plugin.
- Pick the plugin archive and click Install.
- Activate the plugin.
Manually
Upload the plugin folder to /wp-content/plugins/ and activate the plugin under Plugins.
Make sure Easy Digital Downloads is installed and active.
Payment method settings
- Open Downloads → Settings → Payments.
- Enable Cryptoway in the list of payment methods.
- Go to the Cryptoway section and fill in the fields.
| Field | Value |
|---|---|
| Checkout title | The name of the payment method at checkout. |
| Text under the title | One line the customer sees. Can be left empty. |
| Other languages | Title and text for the site's other languages. |
| Project ID | The first value from the Project credentials window. |
| Callback key | The second value. Leave it empty and the plugin will fetch it on save. |
| Secret key | The third value. |
| Time to pay | From 15 to 1440 minutes. 60 by default. The rate is fixed for this period. |
| Minimum order | Below this amount the payment method is hidden. Zero means no limit. |
| Maximum order | Above this amount the payment method is hidden. Zero means no limit. |
| Detailed log | Turn it on while you set things up. |
Save the changes.
Important. Test mode in Easy Digital Downloads is shared by all payment methods: Downloads → Settings → Payments → Test mode. While it is on, orders are not sent to Cryptoway.
Project settings
The rest is configured in the Cryptoway dashboard: open the project and go to the Settings tab.
| Section | What it sets |
|---|---|
| Auto-conversion on receipt | Converts incoming assets into the currency you choose. |
| Payment page appearance | Colour, logo and theme of the page the customer pays on. |
| Payment page layout | Invoice view: one column or two. |
| Project information | The recipient's details. They are printed on the invoice. |
| Fee and markup | Who pays the Cryptoway fee and whether a markup is added to the invoice. |
| Allowed IPs | Server addresses allowed to call the project's API. |
Important. New fee and markup rules apply to invoices created after the change. Invoices already issued are settled by the previous rules.
How a payment goes through
- The customer picks Cryptoway at checkout.
- The plugin creates an invoice for the order amount and sends the customer to the Cryptoway payment page.
- The customer picks a coin and a network and sends the amount.
- The plugin matches the amount and currency against the order and marks the order paid.
- The customer returns to the order confirmation page.
It usually takes seconds from payment to the status change. If the notification does not arrive, the plugin re-checks the invoice itself within ten minutes.
Order statuses
| What happened | What the plugin does |
|---|---|
| Paid in full | Moves the order to «Complete» and records the amount and coin in the history. |
| Less than the order amount arrived | Puts the order on hold and flags it for review. Files are not released. |
| More than the order amount arrived | The order is paid, the difference is noted in the history. |
| Time to pay ran out | Closes the order as unpaid. |
| Payment cancelled | Closes the order as unpaid. |
| Payment held by a security check | Puts the order on hold until Cryptoway decides. |
| Money arrived for an already closed order | Puts the order on hold and warns in the history. |
An order counts as paid only after the amount and currency are matched. Files are not released for an underpaid order.
Checking after setup
- Create a small test order.
- Pick Cryptoway at checkout.
- Make sure the Cryptoway payment page opens.
- Pay the invoice.
- Check that the order moved to «Complete» and that the payment number, coin and transaction hash appeared in its card.
If the status has not changed, open the order card and run the payment status check.
Troubleshooting
| Problem | What to check |
|---|---|
| Cryptoway does not appear at checkout | The plugin is active, the gateway is enabled in the list of payment methods, Project ID and Secret key are filled in, the order amount falls within the limits you set. |
| The payment page does not open | The project has the Active status, the keys were copied from the Project credentials window without stray spaces. |
| The order did not update after payment | The Callback key is filled in. Open the order card and run the payment status check. |
| Cryptoway denies access | Keys are bound to the server address they were first used from. Set up a separate project for the store or clear the list under «Allowed IPs». |
| You need request details | Turn on the detailed log and repeat the order. |
Rates and the coin list are on the Cryptoway site. Support: @cryptoway_support_bot.